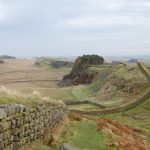
Chesters (Cilurnum) Roman Bridges
Roman Bridges

First bridge at Chesters (Cilurnum)
There were at least two bridges on this spot. The first, less massive than its successor, was probably contemporary with the construction of the Wall in AD 122–4. It crossed the river on a series of at least eight hexagonal stone piers about 13 feet (4 m) apart: the first of these (from the east) can be seen where it has been incorporated into the stonework of the later abutment. The overall length of the bridge between abutments was 200 feet (61 m). The width of these piers suggests that the bridge was intended to convey a structure 10 feet (3.0 m) wide – the width of the Broad Wall in this area – and that it therefore carried Hadrian’s Wall across the river with a series of small stone arches. The masonry appears to have been plain but substantial, and the surviving hexagonal pier bears traces of dovetail cramps of iron set in lead which would have held the stones tightly together.
Second bridge at Chesters (Cilurnum)
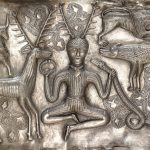
The second bridge was much larger and the new eastern abutment was a far more lofty affair than before, with splayed wing walls both north and south of the bridge’s actual line. This abutment, its massive rectangular stones lifted into place using the lewis holes which are a feature of their upper surface, were held together with long iron ties channelled into the masonry to reinforce the front face. The lewis-holes widen as they penetrate. The lewis consisted of a split wedge which, after being inserted in the hole, was widened out to lock into it by the insertion of a strip of metal between the two halves of the wedge. The hook of the crane was then passed through the head of the lewis and the stone was ready for lifting. From this solid abutment there sprang an elegant bridge with four arches supported on three substantial river piers, 34 feet (10.4 m) apart. Its overall length was 189 feet (57.6 m) and was intended to take a road carriageway. Few voussoirs (wedge-shaped stones from arches) have been found, but there is sufficient other evidence in the form of cornice blocks, grooved to take vertical parapet slabs, and angled mouldings, to show that the bridge was of stone, although others state that the second bridge had a timber superstructure. This second bridge seems to date from the early 3rd century [others give AD 162-5 or AD 206. There is no evidence for any further repair or alteration to the bridge after that date. There is a male fertility symbol carved into the northern face of the eastern abutment.
Excavation of Chesters (Cilurnum)
In the early 19th century Nathaniel Clayton, owner of Chesters House and Estate, moved hundreds of tons of earth to cover over the last remains of the fort as part of his parkland landscaping, thereby creating a smooth uninterrupted grassland slope down to the River Tyne; he collected, before they disappeared, a number of Roman artefacts which he preserved in the family. However his son John Clayton, a noted antiquarian, removed all his father’s work, exposing the fort, excavating, and establishing a small museum for his finds. John Clayton also made excavations at Housesteads Fort, Carrawburgh Mithraic Temple, and Carvoran, amongst others.
Sites near Chesters (Cilurnum) Roman Bridges
- Hadrian's Wall - Milecastle 27 - Low Brunton (0 km)
Hadrian's Wall Milecastle - Hadrian's Wall - Fort - Chesters (Cilurnum) (0 km)
Bath House, Hadrian's Wall Fort, Industry, Roman Bridges, Vicus and Water Mill - Hadrian’s Wall – Turret 26b – Brunton (1 km)
Hadrian's Wall Turret - Hadrian's Wall - Milecastle 28 - Walwick (1 km)
Hadrian's Wall Milecastle - Hadrian's Wall - Milecastle 26 - Planetrees (2 km)
Hadrian's Wall Milecastle - Hadrian's Wall - Milecastle 29 - Tower Tye (3 km)
Hadrian's Wall Milecastle - Walwick Fell Temporary Camp (3 km)
Marching or Temporary Camp - Hadrian's Wall - Milecastle 25 - Codlawhill (3 km)
Hadrian's Wall Milecastle - Limestone Corner Temporary Camp (4 km)
Marching or Temporary Camp - Hadrian's Wall - Milecastle 30 - Limestone Corner (4 km)
Hadrian's Wall Milecastle